In this article I will show you how can configure a branch office VPN tunnel with virtual interfaces on a WatchGuard Firewall.
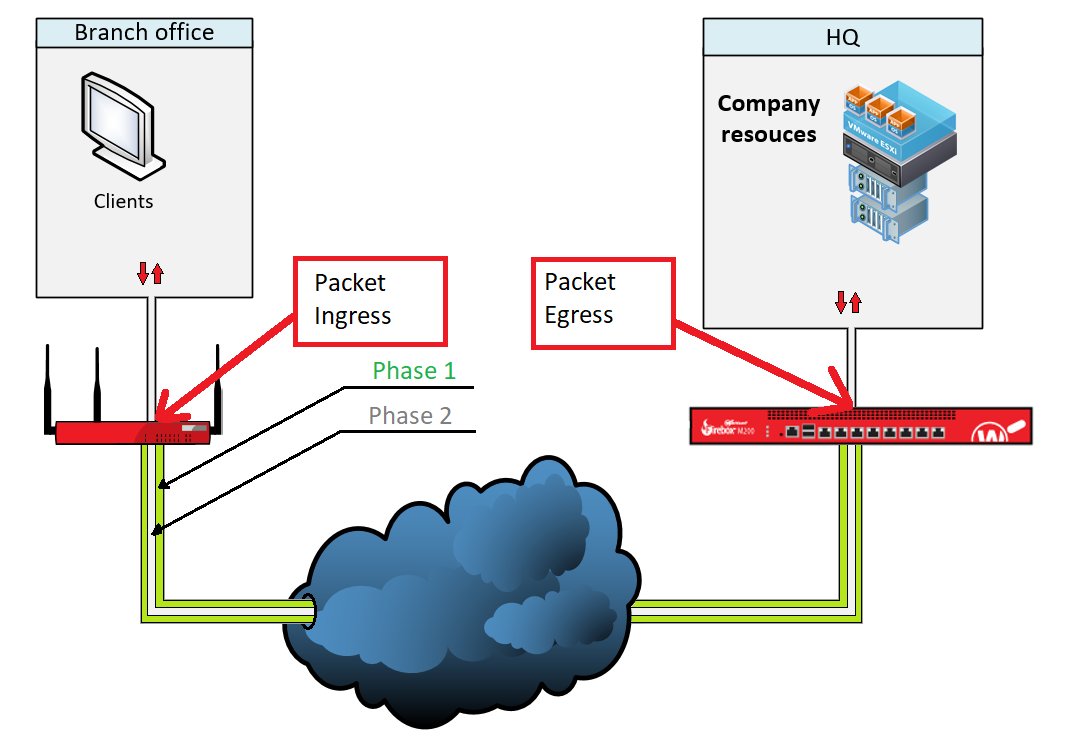
BOVPN-Vif is also called Route Based VPN and normal BOVPN is called policy based VPN. On normal VPN Packets are beeing generated by the kernel and there is no ingress interface in both directions. A packet beeing sent from a branch office to the HQ travels like this:
At BOVPN-Vif however Traffic gets another layer of encapsulations and travels like this:
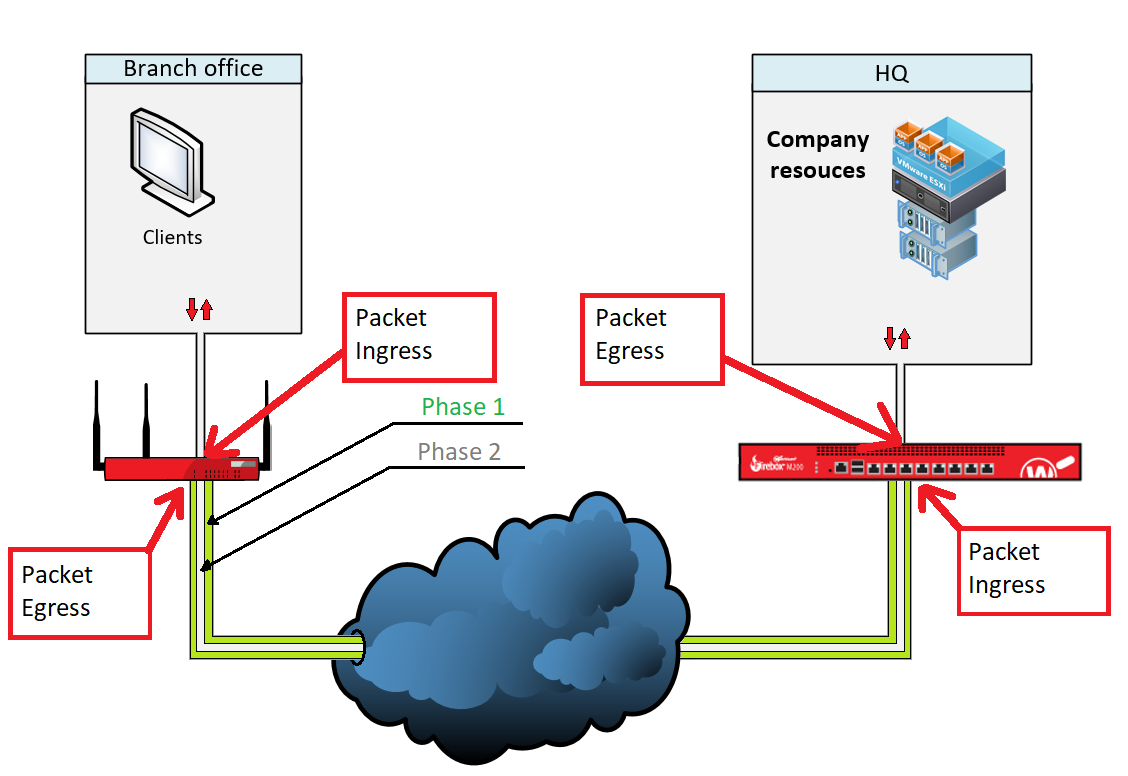
This makes it possible for example to run TCPDUMP against this virtual interface. Trubelshooting gets a lot easier.
Generally one can say that virtual interfaces are the newer technology.
BOVPN:
- Is simple and very solid
- Connects Network to Network
- Only allows for 1:1 NAT
- The networks have to be routed explicitly
BOVPN-Vif:
- There is a 0.0.0.0/0 wildcard, that allows all traffic
- There is a virtual interface and you can write Inbound-Firewallrules
- Supports failover
- Supports NAT
- Supports dynamic routing
Interface configuration:
In this example I will show you a BOVPN-Vif test setup with two WatchGuards.
At first you should facory reset the devices and connect to both of the firewalls. Configure then with 10.0.1.1, 10.0.1.2 and hook them up to a swtich.
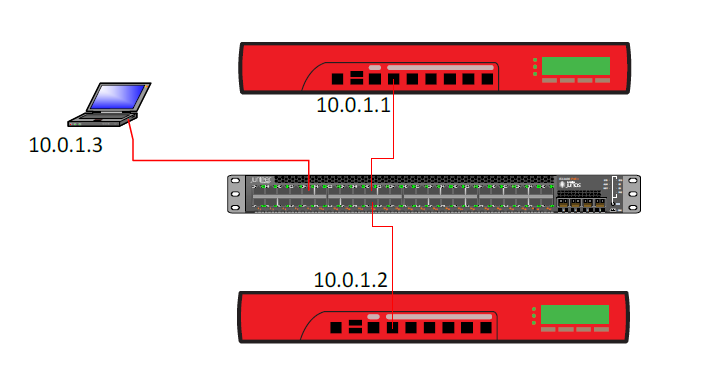
This way you can connect to both firewalls simultaneously using the WatchGuard System Manager. This will make configuration and comparison a lot easier.

Next we will configure a internal network on ETH3 of both boxes. These networks later on will be connected with a BOVPN-Vif Tunnel and promoted via dinamic routing.
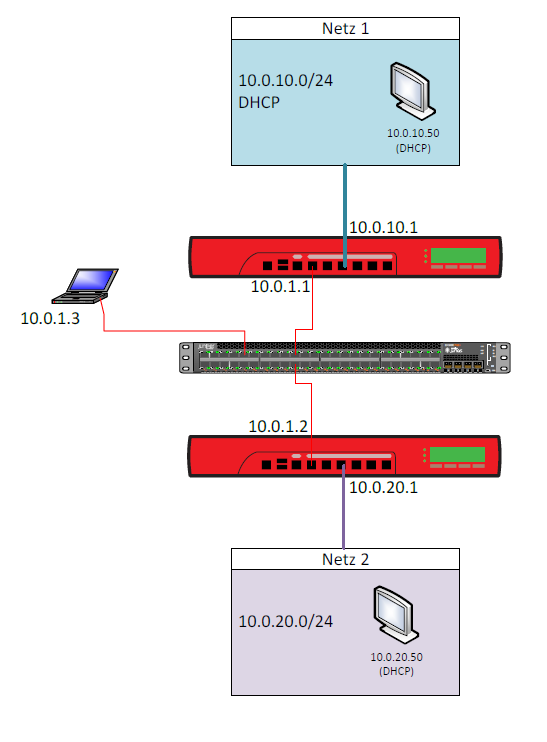
The interface configuration on the firewalls should look like this:
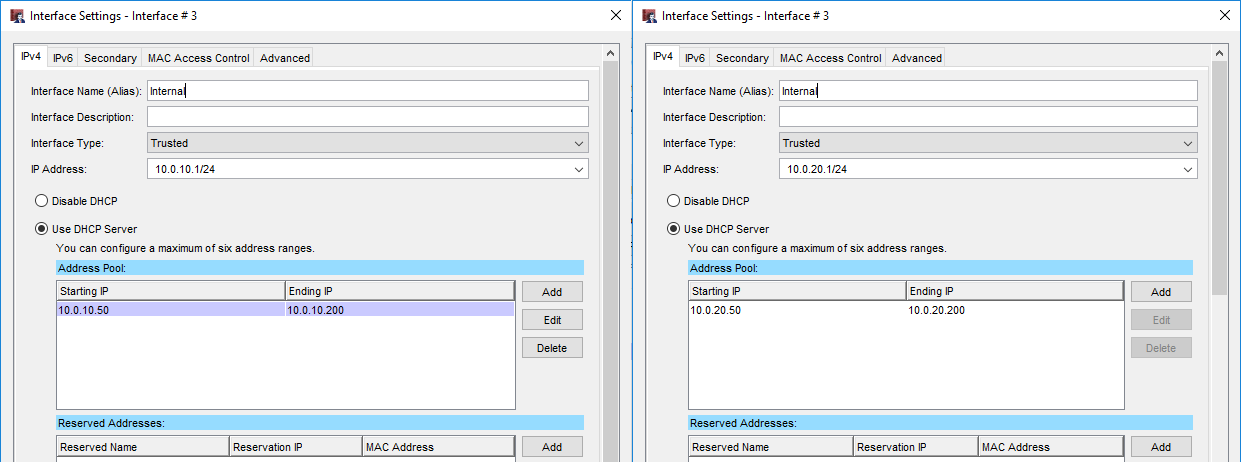
Afterwards we will define ETH2 on both firewalls as an external interface and give it an IP address. In this case I choose 213.73.97.113 and 213.73.97.114.

You can choose a private class C address as well. It just feels wierd to me defining a class C address of type external but it makes no difference. And since you are not conecting the devices to the internet it makes no difference really.
Note that the default gateway has to be the other firewall in this specific case. In a real world envoirement you would provide the next-hop, eg. router or ISP Gateway.

Preparing the BOVPN
Now that the interfaces are configured we will setup the BOVPN. You should be clear on the following parameters prior to setting up the tunnel.
This setup is only one possible example.
General:
- Tunnel Endpoints
- Gateway IDs
- IKE version
- Authentication algorithm
- Encryption algorithm
- Diffie-hellmann-group
- Lifetime
- Encryption scheme
- Negotioation mode
- DPD traffic idle timeout
- DPD max retries
- IKE keep alive
- Encryption protocol
- Authentication algorithm
- Encryption algorithm
- Encapsulation Mode
- Perfect foreword security
- PFS group
- Key expiration time
- Key expiration traffic
Setting up the BOVPN-VIf
At first you set up VPN > BOVPN Virtual Interfaces… in the Policy Manager

Here you will see right away that the setup of the BOVPN with virtual interfaces is way more intutitive and structured then the normal BOVP setup process. In the top we will provide a name for the virutal interface and define what type of device is on the other end of the tunnel.
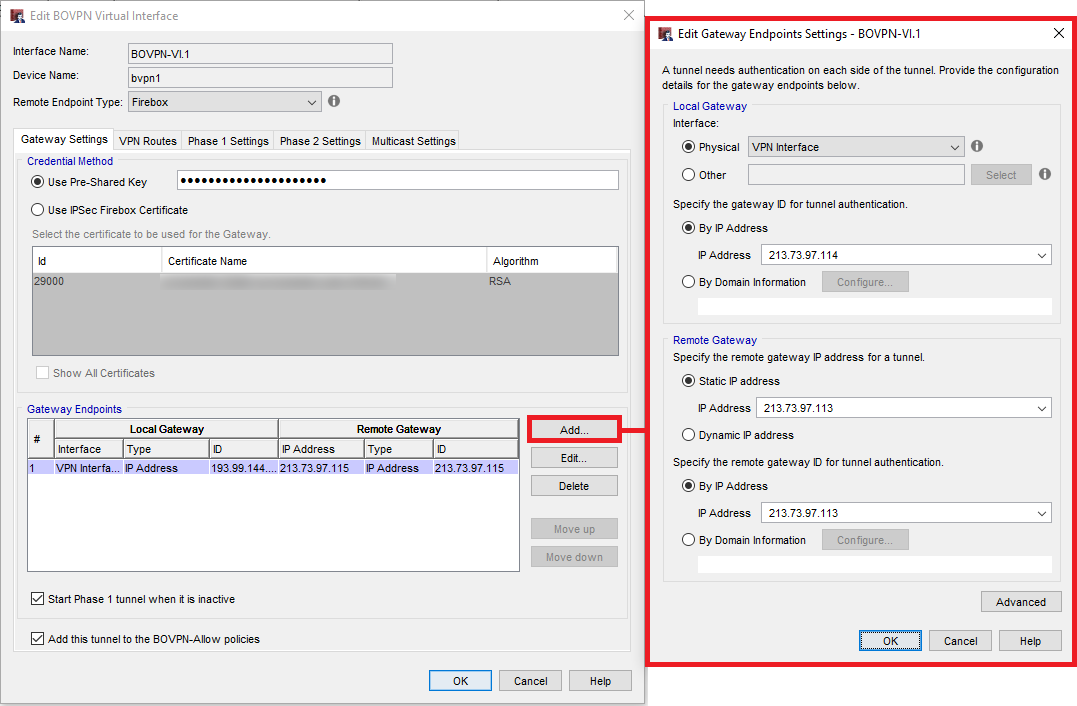
Then we change the following settings in the Gateway Settings section:
- Pre-Shared Key: must be the same on both devices
- Interface Physical: VPN traffic will be sent over this interface
- Gateway ID: IP address of the lokalen gateway
- Remote Gateway IP Address
- Remote Gateway ID
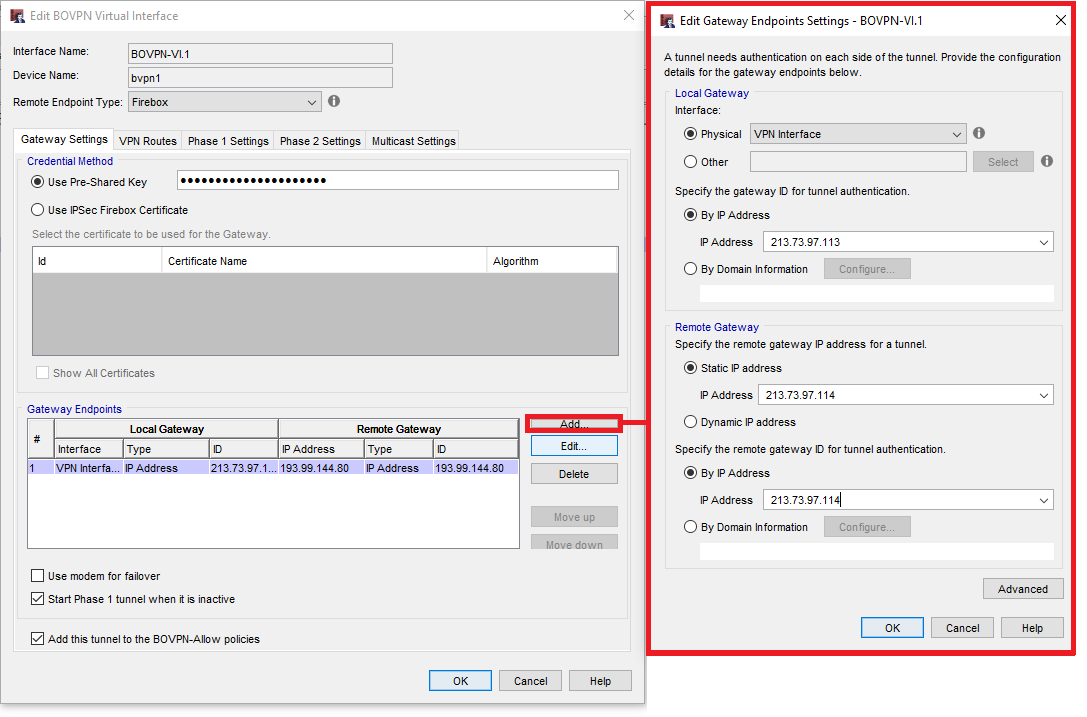
On the other firewall we configure these settings exaclty the other way arround:
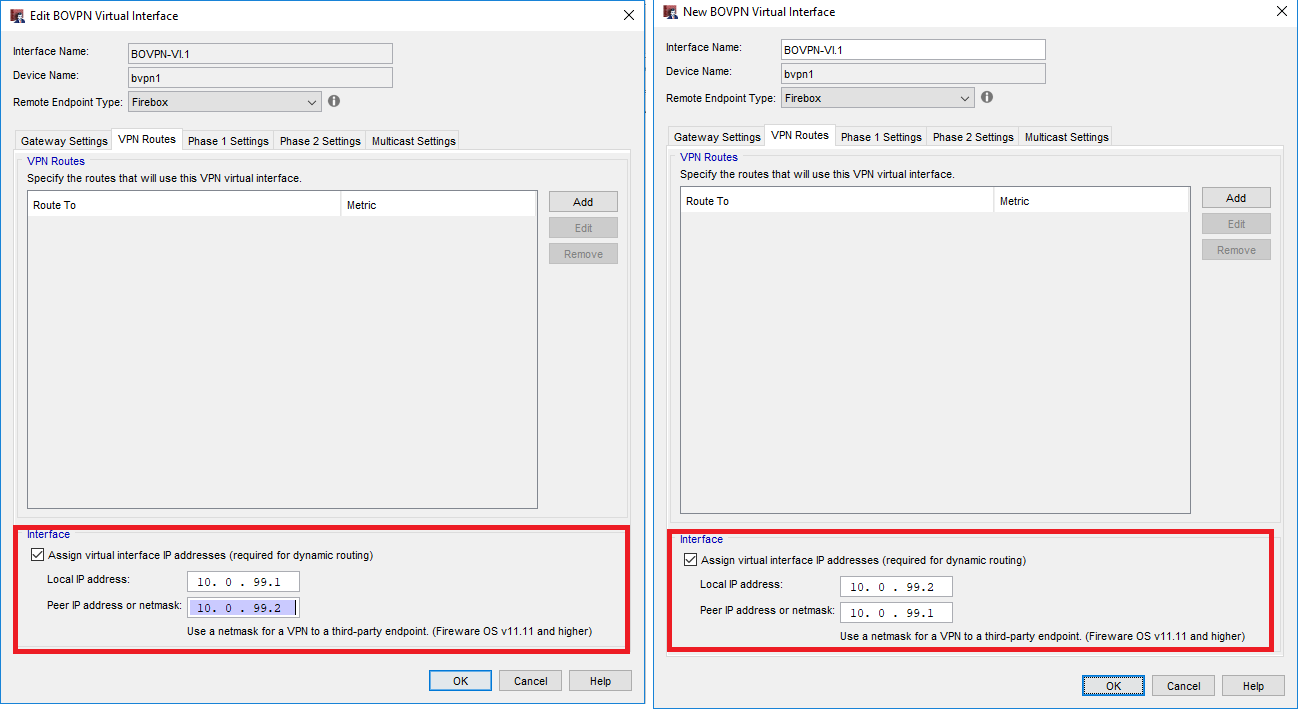
In the VPN Routes section we coud define static routes into the networks 10.0.10.0/24 and 10.0.20.0/24. In this example however I would like to use dynamic routing. This however we will configure later.
Here you can also give an address to the virutal interface. I use 10.0.99.1 and 10.0.99.2 for the firewalls in this setup.
The we switch to Phase 1 Settings. Here we configure the following:
- IKE Version: 2
- Transform: Sha2-256-AES
- Key Group
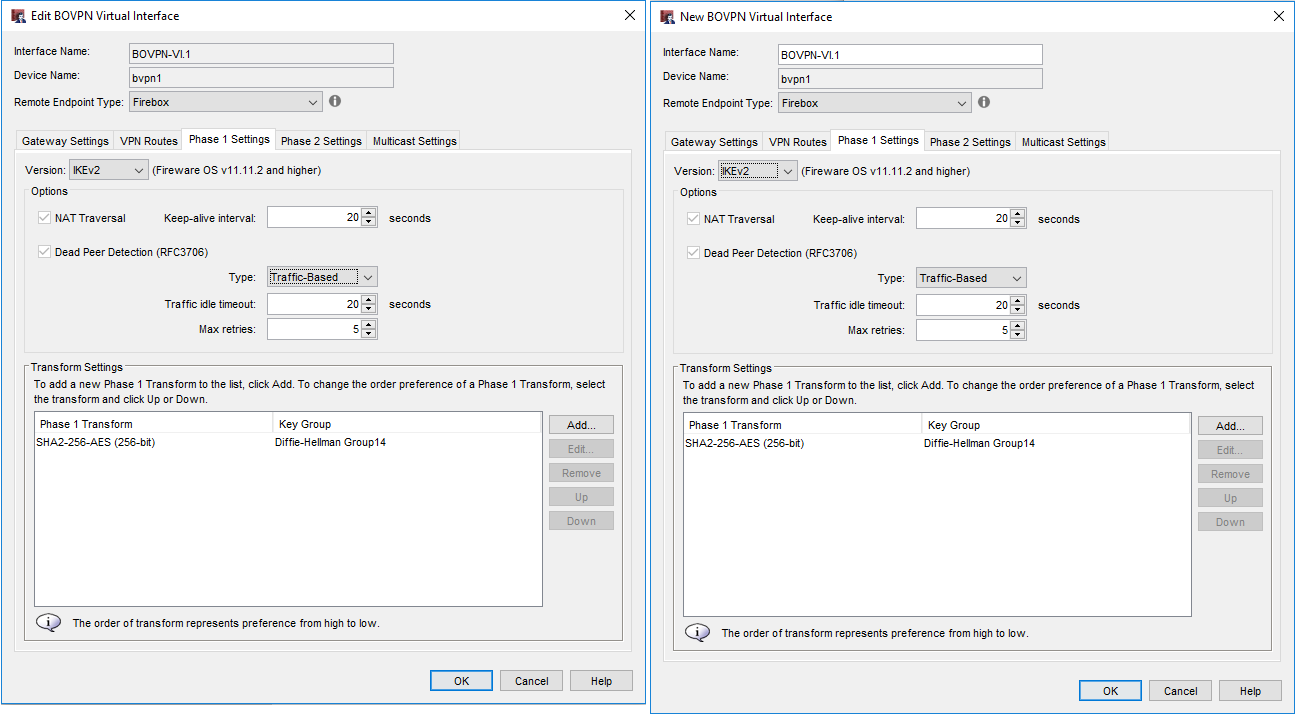
Then we configure the Phase 2 Settings:
- Perfect Forward Security (PFS): Enabled
- DF Group
- IPSec Proposal: AES256-SHA256

We do not need to touch the Multicast Settings.
Now we look at the routing. I use BGP in this example, you can use another protocol if you want. I will not explain this configuration since this is not what this article is about.
Go to Network > Dynamic Routing… activate dynamic routing and switch to BGP. Here you enter the following:
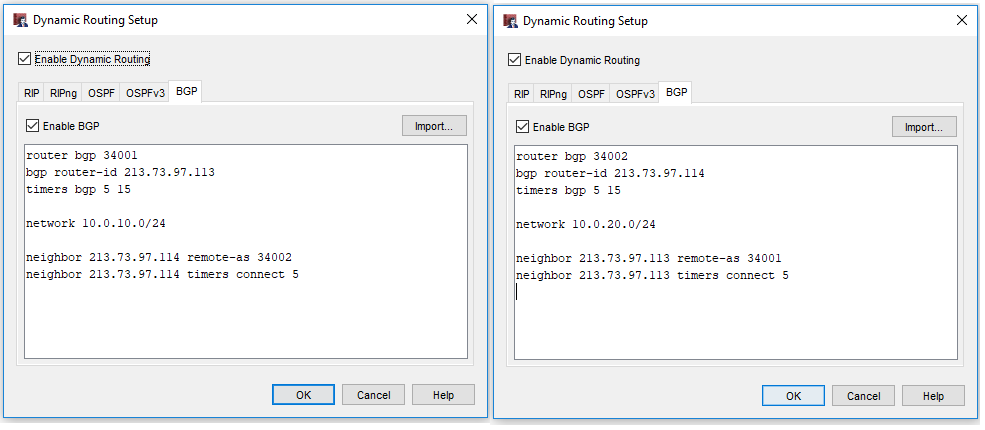
Please choose another AS Nummer, in this case 34001 und 34002, that is above 65000. Your test-setup should be disconnected from the internet. If you somehow are forwaring traffic to the internet however you should know that BGP is the protocol that carriers use to exchange routingtables. The AS numbers above 65000 are unused and free, everyhing below could be the number of an Autonomen Systems of an ISP…
Next we need to configure Multi-WAN since we now have more then one external interfaces. If we dont do that the interfaces are in state FAILED per default and will be ignored.
Select Network > Configuration… in the Policy Manager and change to the Multi-WAN settings in the top right. We will now configure a pingcheck against the other firewall on the VPN Interface.
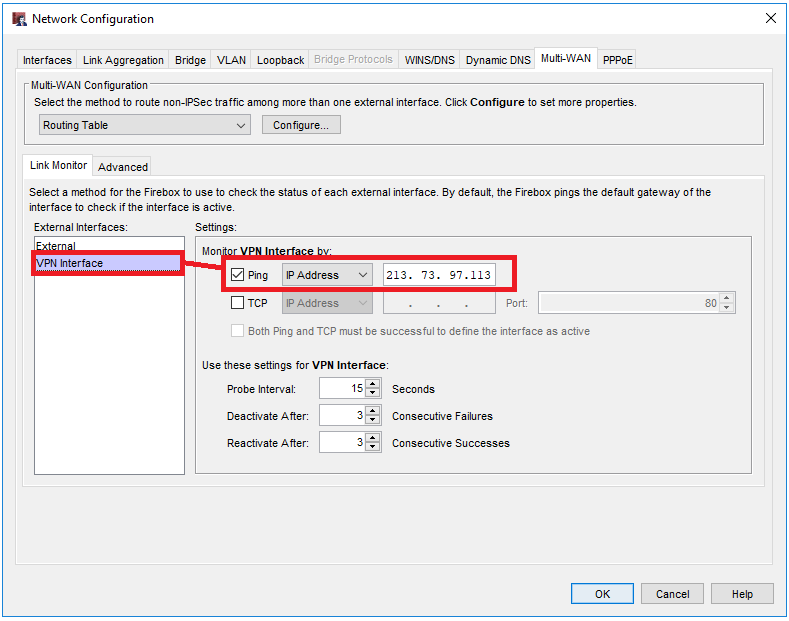
In order for this to work and the interface not beeing in the state of FAILED we will have to add the other firewall on both devices to the ICMP firewall rule.
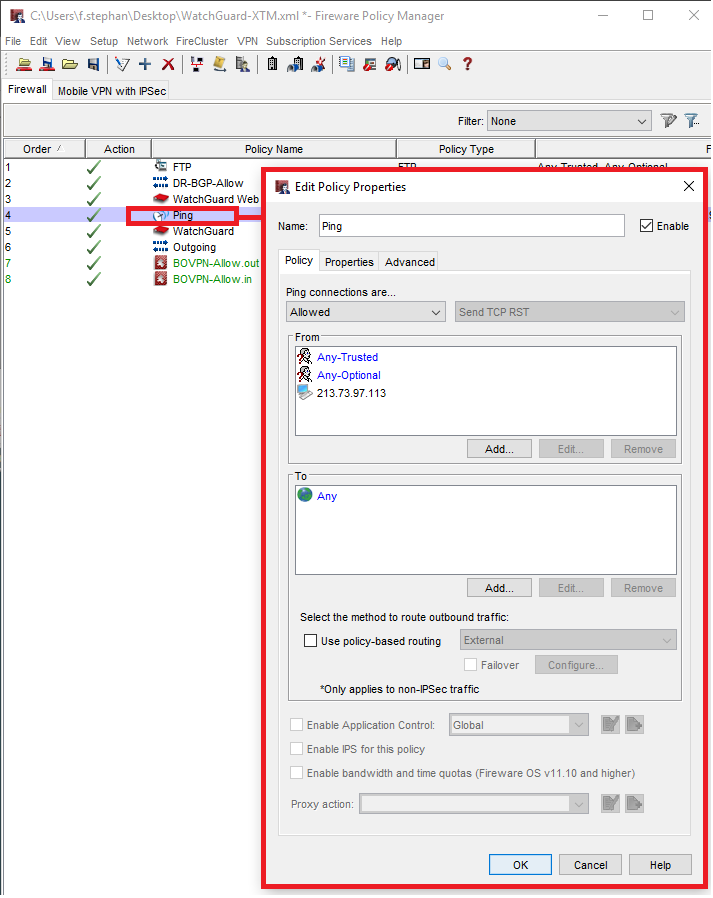
Afterwards you write the config to both devices, attach the cables of the vpn interface and the tunnel should come online after a moment. To test if everything worked fine you can hook up a client to the neworks 10.0.10.0/24 and 10.0.20.0/24.
If the clients can reach each other it means that the tunnel has been established successfully and the routes have been learned dynamicly.
Cheers, Ori